Instructions for OpenStack
| ✅ Paper Type: Free Essay | ✅ Subject: Computer Science |
| ✅ Wordcount: 860 words | ✅ Published: 11 Aug 2017 |
OpenStack is an arrangement of free and open-source software tools that is utilized for controlling substantial pool of compute, storage and networking resources managed through a datacenter which is overseen through a dashboard that gives head control while permitting their clients to spare assets through a web interface. Since OpenStack is overseeing distributed computing platform for both public and private cloud, it is supported by a portion of the greatest organizations and also a large number of individual group individuals.
For creating an instance in OpenStack we need to use the URL cloud.ncirl.ie. To access the cloud compentency centre there is an option for OpenStack. We need to click on that option. A login page will appear where the Domain name is ncirl, we need to put login details like username and password. After login we can check the Instances, VCPU’s, RAM, Floating IP’s, Security groups, Volume and Volume storage etc. if any previous instances is there we can also check those.
In order to create an OpenStack Instances we need to create Key pair. To create key pair we need to select Project →Compute. In Compute options like Overview, Instances, Volumes, Images and Access & Security. In Access & Security we choose the second option Key Pairs. In Key Pairs there is an option create key pair, we have to choose that option. Inside create key pair we have to enter the desired key pair name and click on the option Create key pair. A .pem file will be downloaded to the system, which is used to login to instance using putty.

The second step is to click on instances → Launch instance then a pop up appears where we have to put an instance name. Available zone is nova and count should be 1. We need to select the source for the instance, we select boot source as image and the required operating system can be Ubuntu 14.04. Now we need to select the Flavor, the required flavor is m1.large. In network tab we select private_default. We don’t have to make any changes in network port. In security group tab we select default and http-8080. In key pair we have to select the key pair which was created earlier. In configuration tab we have to paste the shell script for cloud from:
https://docs.openstack.org/developer/devstack/guides/single-vm.html.
Now on clicking the launch instance an instance will be created. Now we have to associate a floating point IP to the instance so that it can be accessed from outside the cloud.
The third step is to go to Puttygen and load the .pem file to generate a .pkk file to access the created instance by windows operating system. Now go to Putty and paste the floating IP in the host name bar and then we add the private key which is .pkk which was earlier generated using Puttygen, now click open.
I command prompt will appear to the created instance where login details is required like username and password. The username is Ubuntu and password is password. After login we have to verify whether the username is stack or not by using the command line cd ~/../stack. Now we have to check whether the script got completed by using tail/var/log/cloud-init-output.log.
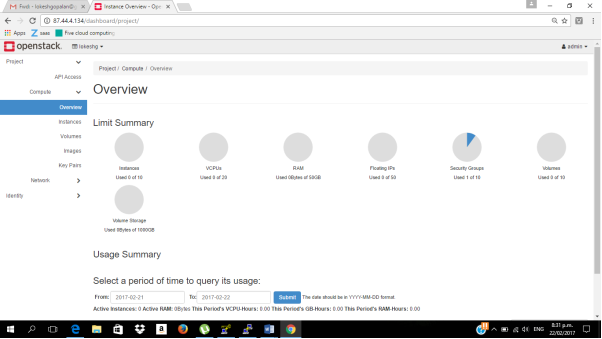
The final step is to open the browser and type the floating IP associated to the instance in the address bar. An OpenStack dashboard will appear where we have to input the username as admin and password as password. An OpenStack horizon will appear where we need to go to Project → Compute →Overview to get the following screen.
Personal experience while creating instances in OpenStack
While creating key pair I saved the .pem file on my local folder in my system.
While generating instance, I faced a problem of getting three IP address on the same instance. I tried for three times each time deleting the previous instance and creating a new one, finally got a single IP on the third try. To make instance visible and for usage we need a floating IP address, but due to limited floating IP it was very difficult to get an IP for my instance.
In Puttygen I had to load the .pem file and generate .pkk file which is a private key for windows user. Then after I had to open the putty and type the floating IP address in Host Name session. After that I had to prompt .pkk file from Auth inside SSH.The other issue was after creating .pkk file I was not able to access the command prompt for instance, then by getting guidance from Dr. Ralf Beirig in lecture and only then I was able to overcome this issue.
After accessing into cloud I checked the user stack by giving commond line “cd ~/../stack” to check whether stack is present or not in home folder then I gave command line of “tail /var/logs/cloud-init-output.log” to show the status of current script. In the URL, I pasted my floating IP and could access the OpenStack horizon by entering username as admin and password as password.
Cite This Work
To export a reference to this article please select a referencing stye below:
Related Services
View all


DMCA / Removal Request
If you are the original writer of this essay and no longer wish to have your work published on UKEssays.com then please click the following link to email our support team:
Request essay removal